Accept an Online Payment on Web
Build your checkout page and integrate with Pay API and Tyro.js to accept payments
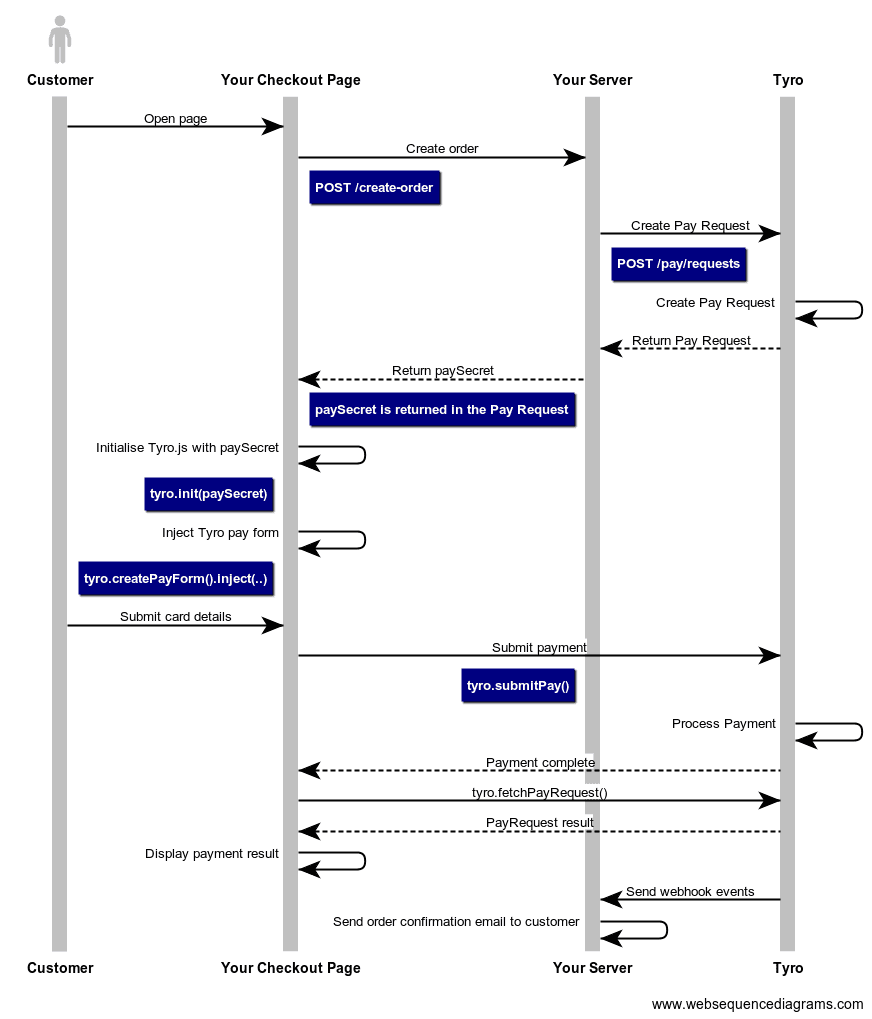
Example Sequence of Payment Flow

Integration Steps
Your Server
1. Expose an endpoint on your server
When a customer loads your checkout page, a request with the order information should be immediately sent to your sever. Your server should calculate the total of the order and send this total to Tyro when creating a Pay Request. The Pay Request Pay Secret should be returned to your checkout page.
// Node sample code
const express = require("express");
const app = express();
const axios = require('axios');

app.post("/create-order", async (req, res) => {
  const { items } = req.body;
  const totalAmountInCents = calculateTotal(items);

  // Create a Pay Request with the calculated total amount
  const payRequest = await axios.post('https://api.tyro.com/connect/pay/requests',
  {
    "locationId": "tc-examplelocation-3000",
    "provider": {
        "name": "TYRO",
        "method": "CARD"
    },
    "origin": {
        "orderId": "order123",
    },
    "total": {
        "amount": totalAmountInCents,
        "currency": "AUD"
    }
  },
  {
    headers: {
    'Content-Type': 'application/json',
    'Authorization': 'Bearer exampleJwt'
    }
  });

  res.send({
    paySecret: payRequest.paySecret,
  });
});
In your Checkout Page HTML
2. Add Tyro.js and set up the pay form
- Add Tyro.js as a script tag in the header.
- Add the pay form and submit button. This is where the Pay Input fields will be injected.
<!-- HTML sample code -->
<!DOCTYPE html>
<html lang="en">
  <head>
    <meta charset="utf-8" />
    <title>Your checkout page</title>
    <script src="https://pay.connect.tyro.com/v1/tyro.js"></script>
  </head>
  <body>
    <!-- Set up the pay form -->
    <form id="pay-form">
      <div id="tyro-pay-form">
        <!--Tyro.js injects the Pay Input Fields -->
      </div>
      <button id="pay-form-submit">Pay</button>
    </form>
  </body>
</html>
In your Checkout Page Javascript
3. Instantiate Tyro.js
Create an instance of Tyro.js.
// Javascript sample code
const tyro = Tyro();
4. Create a Pay Request and inject the Pay Form
- Send your checkout items to your
/create-orderendpoint on page load. - Your server creates the Pay Request and returns the
paySecret. - Initialise Tyro.js with the
paySecret. - Inject the Tyro Pay Form into your HTML.
let paySecret;
// Javascript sample code
async function init() {
  const response = await fetch("/create-order", {
    method: "POST",
    headers: { "Content-Type": "application/json" },
    body: JSON.stringify({ items }),
  });
  paySecret = await response.json().paySecret;
  await tyro.init(paySecret);

  const payForm = tyro.createPayForm();
  payForm.inject("#tyro-pay-form");
}

init();
5. Handle form submit and display result
- Create the form submit function
- Invoke
tyro.submitPay() - Show the payment result when the promise returns without errors. Invoke
tyro.fetchPayRequest()to get the status and display the appropriate messages. - Handle any errors. For example, the customer may have provided an invalid card, an error message could be shown in this case.
- Add the form submit function as an event listener for the
#pay-formsubmit event.
// Javascript sample code
async function showPaymentResult() {
  const payRequest = await tyro.fetchPayRequest();

  switch (payRequest.status) {
    case "SUCCESS":
      return showSuccess();
    case "FAILED":
      return showFail();
    ......
  }
}


async function onFormSubmit(e) {
    e.preventDefault();

    try {
        await tyro.submitPay();
        showPaymentResult();
    } catch (error) {
        const { type, errorMessage, errorCode, gatewayCode } = error;
        // handle errors here
          switch (type) {
            case "CLIENT_VALIDATION_ERROR":
              return showClientValidationError(errorMessage);
            case "SERVER_VALIDATION_ERROR":
              return showServerValidationError(errorMessage, errorCode, gatewayCode);
            case "CARD_ERROR":
              return showCardError(errorMessage, errorCode, gatewayCode);
            case "SERVER_ERROR":
              return showGenericError(errorMessage, errorCode, gatewayCode);
            ......
          }
    }
}

document.getElementById("pay-form").addEventListener("submit", onFormSubmit);